The playfield is the single most expensive part of your Dynamo Air Hockey table. Proper care will keep your table attractive and functional for your players, and bring them back for more games.
NEVER allow drinks to be placed on the table. Liquids spilled on the surface must be wiped up immediately. Large amounts of any liquid will seep down the holes and into the wood, which will warp the playing surface. Prohibit drinks from being placed on the table at anytime. Sideshields are effective in discouraging customers from putting drinks on the table. They will also help keep pucks from leaving the table, and cost less than a new playfield.
CLEAN AIR HOCKEY PLAYFIELD AT LEAST ONCE A WEEK
- Get isopropyl alcohol (regular rubbing alcohol available at any drug store) or window cleaner.
- Turn the table on prior to cleaning, the air from the blower allows the alcohol to evaporate more quickly and prevent damage to the playfield, also helps avoid pushing dirt into the holes
- Apply the cleaners to clean paper towel or rag and wipe down the playfield. DO NOT apply the cleaner directly to the playfield and minimize the amount of liquid on the playfield.
- DO NOT use cleaner, silicones or protectants that leave a file such as Pledge or Armor All. Your playfield will look really nice at first, but the file left on the table will cause it to get dirty much more quickly and dramatically slow down the play on the table. Worse yet, the file is difficult or impossible to ever clean off. Use alcohol or glass cleaner - it does the job best.
- DO NOT CLEAN the rails where the puck hits. The buildup of dust and dirt there actually helps the puck bank properly and stay on the table.
ANNUAL CLEANING
Once a year, check the condition of the air holes. To remove debris from the air holes, do the followings;
- Turn the blower ON and use a Dremel Mototool or equivalent, with a 1/32" drill bit.
- Slowly and carefully insert the rotating drill bit into the hole - no deeper than about 3/8"
- The debris will ride up the grooves on the drill bit and out onto the playing surface
- DO NOT use a pushpin to simply push the debris down into your table
REPAIRS YOUR PLAYFIELD
It is tempting to just opt to replace the playfield until you find out how much they cost! (and ship- ping a 4-foot by 8-foot box costs a bit too) Before buying a new playfield, try these inexpensive repair methods and maybe you can avoid a replacement for now:
SMALL DENTS can be repaired using clear epoxy. Fill the dent with epoxy to the surface level and allow it to harden. Sand off the filled area, if necessary, so it is level with the surrounding surface. Use a fine grade of sandpaper to avoid marring the surrounding surface. Any air holes plugged during the repair process can be drilled out with a 1/32" drill bit to reestablish airflow. You may use a colored marker for touchup, if needed.
LARGER HOLES that actually open the air channel can often be repaired by inserting a common plastic drinking straw lengthwise in- to the air channel before repairing the surface. This will prevent the epoxy from filling the air channel and blocking the airflow.
DELAMINATION due to spill or long-term use in a humid area can sometimes be repaired. You will need:
- Drill with a 5/64" bit
- Syringe
- Razor blade
- White wood glue (Elmers)
- Non-adhesive material (Wax paper)
- A flat weight (Large and heavy enough to cover and hold down the area)
How to Delamination;
- Locate the center of the rise. Using the 5/64" drill bit, begin at the center of the rise by drilling into the wood between the rows of air holes. Drill holes in a lengthwise pattern approximately every 6 inches of the affected area.
- Use the syringe, inject glue into the new holes between the playfield and wooden backing. Aim toward the goal ends. This way the glue does not get into the air channels, and actually works to repair the playfield.
- Use the flat weight to hold down the area, with the non-adhesive material between the weight and the surface. Allow 24 hours for the glue to set before removing the weight.
- Slightly overfill the drilled holes with glue and allow to dry. Carefully use a razor blade to remove all excess glue after drying. Touch up the surface with a marker if needed.
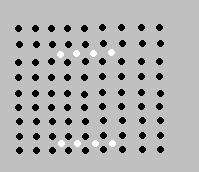
On the illustration, the black dots represent the approximately once-every-inch air holes in your playfield. The white squares are where the holes should be drilled. Between the air holes so you actually drill the wood and not the air channels, and about Six inches apart. For larger areas, use more holes.